

Record video in Powerpoint
The recording tool in Powerpoint for Windows has been significantly improved and now it is easy to make a video of a Powerpoint presentation.
If you have questions or want to know more, contact the ICT educational developers at Akademus.
How do I prepare for recording?
In order for the recording to go smoothly, it is important to prepare.
Create a presentation
It is best to create a new presentation that is prepared from the start to use for recording. You can then make room in the presentation for your webcam image and adapt the content to match your script.
Save a copy to use for recording
Whether you're reusing a presentation or creating a new one, it's a good idea to make a copy of your presentation and make your recording in the copy. Then you have the opportunity to use your original presentation as a normal powerpoint without the risk of your webcam recordings starting.
Split the presentation - make shorter videos
If you have a long presentation, divide it into several shorter parts and make a number of shorter videos. Working with shorter videos has many advantages. For example, you don't have to redo the entire long video if a small part of the content becomes outdated, and you can easily use one of your shorter videos in another course.
Make the presentation independent in time and space
Let the presenation be as independent as possible by, for example, not writing the date, semester and course code in the presentation. Also remember not to verbally refer to other things in the course, for example: "... as we did last week..." or "... in a previous film..." and to use clothes that are seasonally neutral. Then it will be easier to reuse your video.
Write notes
Your notes can be displayed as a teleprompter and are a good memory support during the recording.
Get the right equipment
A headset provides the best sound when recording and no disturbing sounds from the surroundings are included in the video. Always make a test recording to hear for yourself how the sound turns out in the video. With an external webcam, it is easier to get a good angle on the webcam image.
How do I start a recording?
You can find the recording function at the top right.

Now the recording window opens. Start by going through the settings according to the video below. Make a test recording and when everything works as you intended, you're ready to record.
Note: No audio is recorded when you switch slides, so pause when switching.
How do I retake a slide?
Once you have made a recording, there is the option to re-record a single slide or for the entire slide show. Click the round arrow next to the record button.

Tip: Update your video
If the content on a slide isn't relevant when you plan to use your video for a second time, you can create a new version of the video.
- Re-record the slide that needs updating.
- Remove the webcam to make it less obvious that the recording was done at different time.
- Export a new version of your video.
How do I post-process my recording?
After the recording is done, you can change where your webcam is placed on the slide. You can also change its size and trim the beginning and end. Start by exiting the recording window with Edit, you will then return to that editing view. Now you can post-process your recording.

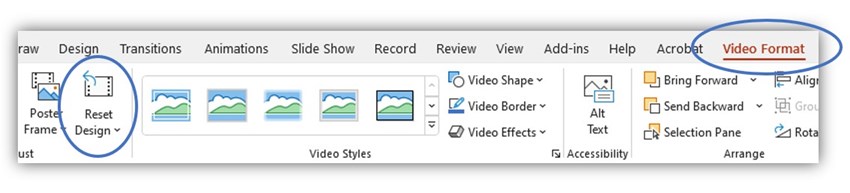
If the webcam recording is circular and you want a square image instead, you can select your video, select Video Format and then Reset Design.
How do I make a screenrecording?
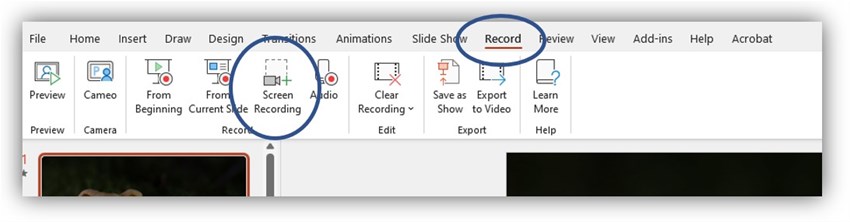
Screen recording is not done in the same place as recording with a webcam. Instead, open the Record tab and select Screen Recording.
Select the area to record, it can be a part of your screen or the whole screen. Then start recording. When you are done, move the mouse cursor to the top of the window and the menu with the stop function will appear. When the recording is finished, you can move it around and resize it in the same way as with the webcam image.
How do I export the video?
When the video is ready, the last step is to export to a movie file that you can, for example, upload to HV Play. On HV Play, you can then subtitle your video.
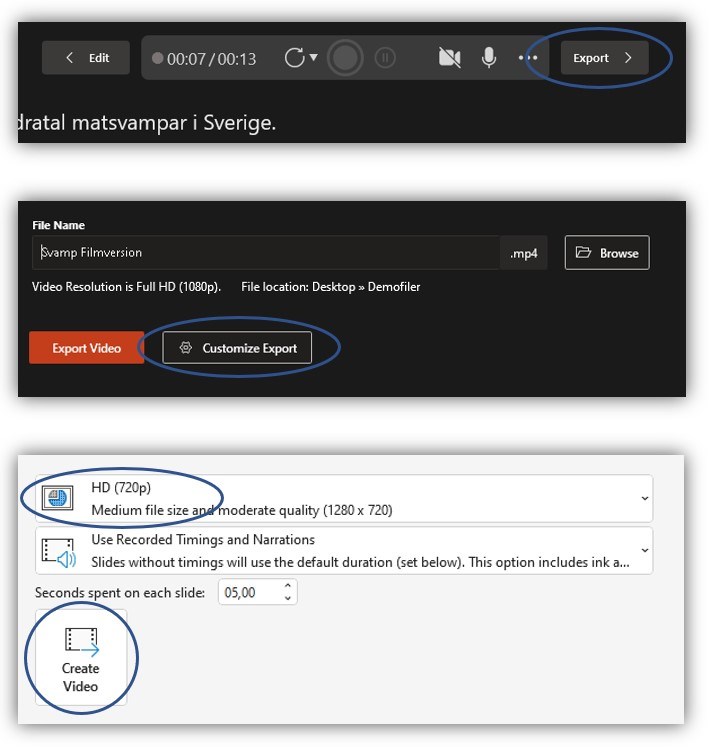
- Click Export.
- Select Customize Export.
- Change the resolution to 720p. This is usually enough for this type of video. The export is also faster and the file is easier to handle.
- Start the export with Create Video. It may take a while before the video is ready.